Here is my tutorial on the woven ribbon flower I did on my SOD layout called "My Girl". I used a strip of mesh on the layout flower, but it is easier to show you the tutorial with using a strip of ribbon I had from my stash. There seems like a lot of steps to this, but it's actually pretty fast moving and easy to do. You can choose a die of your chose as long as the petals are wide. I used a die I had on hand, but this can also work with the six point flower from the Tim Holtz tattered flower die. Here's what you will need:
- Large and Small Flowers Similar to The Ones in the Pic
- Approx 2 Feet of Ribbon (Sizes vary with flower sizes so this should give you plenty to work with)
- Exacto Knife
- Adhesive
- Ink, Stickles, Centerpiece Decoration
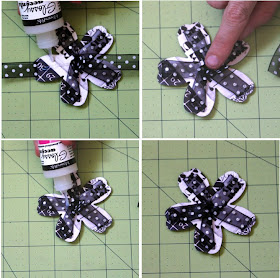
 Use your exacto knife to cut slits in the tip of each petal, but don't go to close to the edge. You can cut a center out or use a standard hole punch, like I did. It doesn't have to be pretty, just big enough to allow multiple sections of ribbon through. Box 4 shows how to start your ribbon and about how much to leave on the starting end.
 Here is the basic steps to weave the ribbon onto your flower. Follow these pictured steps until you get all the way around your flower.
 This is what you should be left with, once you finish weaving the ribbon.
 I used glossy accents and ran a small strip on the back of my exposed pedal and pressed down until it stayed. I cut the end of my ribbon that I wove and left enough to glue down as well as shown in the pictures.
I forgot to ink my edges in the beginning so I just did them now. I used cats eye chalk because it fits into the tight spots way easier.
 Now take some adhesive and glue down your smaller center flower. Decorate your center with an item or items of your choice.
I used stickles along the tips of both the large and small petals. 

So this is a finished Woven Ribbon Flower. Hope you enjoyed the tutorial!!


Super cute!!!!!!
ReplyDeleteAdorable flower!! Love how it looks!!
ReplyDeletesweet!
ReplyDeleteI can't wait to make these. How adorable!! Thanks for sharing.
ReplyDeleteAwesome,Mandy!!!! TFS!!!!!!!!!!!
ReplyDeleteWhat an awesome tut! Thanks for sharing it, Mandy! I can't wait to play around with it!
ReplyDeleteReally, really cute. Thanks so much for sharing!
ReplyDeleteLook at you go with the cute flower tut! love your tuts!! LOL~ They are really sweet.
ReplyDeleteSuper cute flower, Mandy! Thanks for sharing!
ReplyDeleteThis is such a great tutorial! Thanks for sharing this with us! It's such a pretty and unique flower!
ReplyDeleteYou rock the flower tutorials gurl!!! TFS! I just may have to use this one soon! :0)
ReplyDeleteMandy, this is really a super cute flower! I can't wait to give it a try! TFS!
ReplyDeleteLovely idea and thanks for sharing via the tutorial!
ReplyDeleteSuper tutorial... I will try and make my flower soon.. Thank you for sharing.
ReplyDeleteSmita
Love this -- thanks for sharing!
ReplyDeleteThanks a lot for this tutorial.
ReplyDeleteGod blessing!!
thanks for the tutorial. I love the music on your site! God bless you!
ReplyDeleteHello, my name is Daniela and I loved your blog.
ReplyDeleteMy blog is:
http://lojadaneka.blogspot.com.br/
thank you very much
This is really cute. I can't wait to use it. Thanks for sharing.
ReplyDeleteJust came across your video, tried it and love it. Thank you for sharing.
ReplyDeleteI love this. Can't wait to try it. Thanks for sharing.
ReplyDeleteI love this. Can't wait to try it. Thanks for sharing.
ReplyDeleteFantastic idea and lovely tutorial. Will be trying these out for sure! :)
ReplyDeleteLove the tutorial. I'll try the flower next in my craft makings. Thanks for sharing.
ReplyDeleteCOMMONLY CONFUSED WORDS
ReplyDeleteTake the words pedal and petal, for example.
Pedal is defined as "a foot-operated lever" that controls the speed of various mechanisms.
Drop the "D" and replace it with a "T" and you have a petal, which is a "colored segment of the corolla of a flower."
The idea and tutorial are lovely. Thank you for sharing
ReplyDeletevery cute!
ReplyDeleteGreat Post! Thanks for your share! You can get ribbons with 196 colors and 19 sizes for choice from Yama Ribbon with the best deal!
ReplyDeletewhat a great idea looks good
ReplyDeleteVraiment très jolie
ReplyDeleteMerci
Is the white petals made out of paper
ReplyDelete