Pages

Monday, January 23, 2012

~Dusty Attic Old Wood Tutorial~

Recently I created a layout of my son and used one of the new Dusty Attic doors.  I treated so that it had a old wood look and I wanted to share how I did that today.  I will apologize for the dark photos, but I have had almost zero natural light for several days with several more days to come!! That's the fun of living in Oregon!!  Let's get started with the layout, so you can see the true colors of the wood look!!
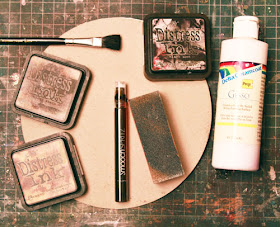
 Here's what you will need!! I used a round piece of chipboard that came out of the center of the large Filigree Frame from Dusty Attic!! 

1) Dusty Attic Chipboard Item
2) Gesso
3) Paint Brush
4) Sanding Tool
5) Wood Stain (Smooch Spritz) or very dark brown to black Spray
6) Vintage Photo Distress Ink
7) Walnut Stain Distress Ink
8) Black Soot Distress Ink
9) Paper Towel or Rag
 Step 1)  Lots of Gesso to create a thick raised coat of paint
 Make sure you stroke the brush in one direction and let it have raised, chunky areas!  The smaller the brush the smaller the grain, so consider what it is you are treating and the size of the wood look you want to go for.
 Step 2)  After the Gesso dries sand it a little to rough it up, but don't over flatten the Gesso
 Step 3) Now take your lightest ink, or Vintage Photo ink
 Rub the ink lightly back in forth following the grain of the paint, so up and down so to speak.  It should look like the picture below.
 Step 4) Do the same thing with the darker brown ink or Walnut Stain ink
 It should start looking like the picture below.
 Step 5) Spray several sprays of your Wood Stain Smooch Spritz all over your chippie then quickly wipe with the grain back and forth.  Before it dries!!

 Step 6)  After it dries go over it lightly again with your sanding tool.
 Step 7)  Very very lightly go over the front and the edges with your Black Soot ink.  Not too much, just sort of here and there!!
 Final Pic!! Again the pic coloring is terrible, but I think you get the idea of how cool this look is!!
Thanks for stopping by and God Bless!!


Friday, January 20, 2012

~Dusty Attic and Punky Scraps Challenge #39~

This is my last challenge for Punky Scraps and it's the funnest of the month!! The Get Picky Challenge!!  I decided to use some of the yummy new chippies from Dusty Attic as well!!   Here is what you need to get picky!!  Choose three from the list and have fun!!


Kerry: Since it is the month of fresh and shiny new starts I'll choose something shiny
Cheryl: in the same vein as kerry, since you might wish to turn over a new leaf in the new year, let's have something to do with books
Misty: stenciling or masking
Jolanda: Use some charms
Ashley: have some negative space
Celina: Use silver or gold
Marie: Use Stickles
Kat: bubble wrap


I decided to go with a photo of Brooky playing in her Snow White dress.  I called this layout Your Story to go along with Cheryl's pick of something to do with a book.  I also did some masking, used Stickles, has shiny pearls, and had a tad bit of negative space.  I used some papers from Prima and the Dusty Attic chippies are one of the brand new bird cages, type writer font, and the beautiful cherry blossoms!!
 Here are some close ups!!  For the partial punch work I used Martha Stewart's doily punch on the main paper and her Doily chain punch for the darker paper behind.
 For these blossoms I used them first for masking which is pictured below and then I treated them with some purple and green Stickles for the blossoms!  My weather here has been so dark and rainy, so decent pics are really hard to get! :(
This adorable birdcage is one of the brand new chippies not yet available for purchase.  I chose to leave my bare with some pearl accents.  So sorry about the poor pics, but the masking is behind this cutwork!
 Here is a close up shot of the hand stitching and the typewriter font chippies from Dusty Attic!!  Such a cute font!!
Thanks for stopping by and God Bless!!

Thursday, January 19, 2012

~Awesome News From Scraps of Darkness~

This is a bit late, but it's some super exciting news that I wanted to share with you all!!  We have had a lot going on over at Scraps of Darkness lately!! 

We are expecting a new baby!! No, nobody at SOD is pregnant, as far as I know, but Scraps of Darkness is going to have a new little sister!!

On February 1st, there will be a reveal of a new line of kits, Scraps of Elegance.  These kits will be a little different from what you are used to seeing from Scraps of Darkness, and we are honored to have a very talented surprise guest designer who will be helping us to show off our first Scraps of Elegance kit.  In addition to that (as if that wasn't enough!), there will be a blog hop to kick it all off, so set your calendars to stop back by Scraps of Darkness on February 1st!!  

Now the bad news is I won't be able to participate in this awesome hop due to some upcoming events I will be taking care of in my family life, but I will be sure to post where you need to go and how to get started on the hop on February 1st!!  


Tuesday, January 17, 2012

~Dusty Attic~

I am excited to say that I have been asked on for another year with Dusty Attic!!  YAY!!  With that said I got to play with some of the new chippies that aren't even available for purchase yet!!  Here is what I made!! 

I don't scrap my son very often, so it's nice to get a pic of him and be able to scrap a guy page for a change!!
 The lock and key are some of the new DA chippies!!  I embossed mine for a metal look!!
 There are a bunch of different doors and these mini locks with keys as well!!  I plan to do a tutorial on the old wood door technique!! Look for that very soon!!

 Another new chippie are barcodes!!!  For mine I just inked it real quick with black soot ink!!
Thanks for stopping by and God Bless!!


Sunday, January 15, 2012

~Scraps of Darkness January Kit Reveal~

"Searching for my lost shaker of salt" ~ Jimmy Buffett

Another month and another amazing kit from Scraps of Darkness!!  This month's kit is called Escape and it's packed full of Graphic 45 and tons of other awesome goodies and papers!!  This is also another wonderfully versatile kit as you will see from my pages below!!  

This first page is of my youngest daughter a couple of years ago.  She was at a swimming pool having a blast.  This page is based on Charlotte's aka Suepup's sketch for the month!!  I called this one My Lil Guppy!

 I added in some older Dusty Attic chippies from the Baroque Circle Frame Set!  I coated them with some of the Lindy's Color Shot that came in the color add on.  I just mixed some clear glaze, water, and color shot together and it came out beautifully.
 I used to do this a lot when I made pre made pages way back when.  I have seen a few people doing this again and I thought I would throw a picture ribbon on myself.
 This is the other close up of the 2nd chippie from the same frame set.  
This is a photo of my dh and three of my daughters at the Oregon Coast.  It's such a beautiful and clean place to visit.  This layout shows some of the warmer color tones included in the kit.
 The sand dollar is real!! How cool is that?
 This is tricky netting to use, because it larger than most, but I tacked mine down with some glossy accents and let it dry.  After that it was good to go.
 These are some super cute little tags and I inserted a bit of journaling into mine.
 Renea made these gorgeous butterflies!! So cool!!  For the corrugated cardboard I used Lindy's mists and painted some of it with TH crackle paint.  After it dried I added some embossing powder over the top of it for added detail.
This next one is of my youngest and her best friend hanging out in the sunshine.  I love the look on Brooky's face and they reminded me of a couple teenagers sitting around and gossiping.  To get this crumpled up look, just spray your paper heavily with water and scrunch away.
 The leaves for these flowers were cut from one of the pieces of patterned paper in the kit.  The bottom blue layer was done using the stamp from the color add on and I layered the rest with a punch I had and some flowers that came with the kit.
I did the stitching by hand using some sparkly floss and it was such a pain to work with lol.  Not as smooth as regular floss.
 I added some more cut out flowers from the patterned paper to place behind this feathery flower.
 I used some of the beautiful Lindy mists from the color add on for this and I added the white faux stitching and little dots using a Signo white pen.
My last one is the brightest! This is a pic of Rylee, Tyler, and a friend of there's.  Well their shadows anyway!  I thought it was a pretty fun pic!!

 Here is another shot of one of Renea's super cute butterflies she created!!

 I did some masking, but it's hard to see!!  The doily tabs are from my EK Success Doily Flower punch.
Here is one last look at the main kit :)
Thanks for stopping by and God Bless!!


Friday, January 13, 2012

~Punky Scraps Challenge #38 - Scraps of Darkness~

I am sad to say this is my last month with Punky Scraps and this is my second to last challenge layout.  Challenge #38 is the sketch for the month and here is my take!  I created this page using some left overs from the Scraps of Darkness December kit and a couple chippies from Dusty Attic!!

This photo is of my youngest daughter.  She is making the peace sign, which is a really common pose for her lol.  She learned it from her older sisters.
 Love these crocheted flowers by Basic Grey!! So cool to work with!!


 I didn't do a lot to the chippies this time.  Just took some distress ink and blending tool and went around the edges of the frame and bottom of the title. 
Thanks for stopping by and God Bless!!