Recently I created a layout of my son and used one of the new Dusty Attic doors. I treated so that it had a old wood look and I wanted to share how I did that today. I will apologize for the dark photos, but I have had almost zero natural light for several days with several more days to come!! That's the fun of living in Oregon!! Let's get started with the layout, so you can see the true colors of the wood look!!
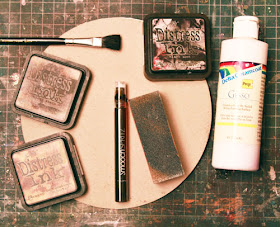
Here's what you will need!! I used a round piece of chipboard that came out of the center of the large Filigree Frame from Dusty Attic!!
1) Dusty Attic Chipboard Item
2) Gesso
3) Paint Brush
4) Sanding Tool
5) Wood Stain (Smooch Spritz) or very dark brown to black Spray
6) Vintage Photo Distress Ink
7) Walnut Stain Distress Ink
8) Black Soot Distress Ink
9) Paper Towel or Rag
Step 1) Lots of Gesso to create a thick raised coat of paint
Make sure you stroke the brush in one direction and let it have raised, chunky areas! The smaller the brush the smaller the grain, so consider what it is you are treating and the size of the wood look you want to go for.
Step 2) After the Gesso dries sand it a little to rough it up, but don't over flatten the Gesso
Step 3) Now take your lightest ink, or Vintage Photo ink
Rub the ink lightly back in forth following the grain of the paint, so up and down so to speak. It should look like the picture below.
Step 4) Do the same thing with the darker brown ink or Walnut Stain ink
It should start looking like the picture below.
Step 5) Spray several sprays of your Wood Stain Smooch Spritz all over your chippie then quickly wipe with the grain back and forth. Before it dries!!
Step 6) After it dries go over it lightly again with your sanding tool.
Step 7) Very very lightly go over the front and the edges with your Black Soot ink. Not too much, just sort of here and there!!
Final Pic!! Again the pic coloring is terrible, but I think you get the idea of how cool this look is!!
Thanks for stopping by and God Bless!!


Thanks so much for sharing your technique, Mandy!! It looks fab!! I sure miss Oregon....
ReplyDeletelooks amazing!!!!!
ReplyDeleteSuper!thank you!)))
ReplyDeleteMandy what a fabulous tutorial..love love love what you did here!! i cannot wait to try it!!
ReplyDeleteGreat tutorial, Mandy!
ReplyDeleteAwesome Mandy!!! Thanks for sharing!!!
ReplyDeleteAwesome tutorial Mandy! Thanks so much for sharing :) And I LOVE the layout ....that DA door chippie is wonderful!
ReplyDeleteWow Mandy!! This is sooo cool!!!! Thanks for sharing...your tut. rocks!!
ReplyDeletecool technique I cant wait to use it
ReplyDeletewowowow i love your work soooo much, i hope when i grow up i wil get as good as you(lol)
ReplyDeletethanks so much for the tutorials..
This comment has been removed by a blog administrator.
ReplyDeleteWow! who knew you could do this with paint/inks! I need to buy some Gesso, I thought it was only used for canvas and oil painting!!
ReplyDeleteThank you for this very cool tutuorial! I am always in awe of all your layouts.
ReplyDelete