Friday, June 29, 2012

~Dusty Attic Canvas~

I have been doing a lot of wall hangings lately and decided to do a canvas again.  I was inspired by a project I saw by Gabrielle Pollaco that she did recently and loved how she did the background of it.  Then I realized I owned the book she had been inspired by.  The book is called Collage Couture by Julie Nutting!!  Fantastic book!!  Anyways this is what I came up with.  I call it Twinkle.  

The background is compiled of several different pieces of torn patterned paper adhered with mod podge!
These are the new Flutterbies #2 Chippies.  For all the chippies on this canvas I did a trick using mod podge and napkins.  I plan on doing a tutorial soon to show how I did it.  


Thanks for stopping by and God Bless!!


Sunday, June 24, 2012

~Fairy Wall Hanging with Donna Salazar Designs~

 I'm back to show you a wall hanging I made for my daughter Brooklyn.  I had a ton of fun creating the background for this and I wanted to show you how easy it is to mix your Smooch Spritz sprays and Stamping to create a beautiful background.
For my background I used the Zutter 8x10 Art Board.
For the Smooch Spritz sprays I chose to use Holly Berries, Sea Breeze, and River Mossy.
I also used Mix'd Media Inx in Mossy.
For the stamp I used the Dear Sir stamp by Stampers Anonymous.
Then I had some water in a spray bottle and some paper towels.

I sprayed my board three times with Holly Berries in the middle and then sprayed it a couple times with water to puddle it up.  After that I dabbed the board using a paper towel.
Next I went around the edges with Sea Breeze and used water to spray inward to push the color towards the center.  Then I dabbed it again with a paper towel.
I did the same using River Mossy and again used the water to push the ink inward and blotted it with a paper towel.  The colors wash together and blend very well.  I decided to add a bit more red to the center as well.
After my board dried I went around the edges with my Mossy ink and used a Color Box blending tool to blend inward just a bit and making it a bit heavier on the edges.
After that I took my Dear Sir stamp and went over a few spots about two or three times. When I use stamps with writing like this, I like to make it look imperfect by stamping more that once in different spots.  
Here are some more close ups of my project. 


Thanks for stopping by and God Bless!!


Friday, June 22, 2012

~Scraps of Darkness June Kit Reveal

This month's Scraps of Darkness kit is called White Rabbit and it's loaded with the gorgeous Wonderland papers designed by Finnabair herself, along with papers from Bo Bunny and Authentique!! Oh boy, this kit was SO SO much fun to work with!! I love it!!

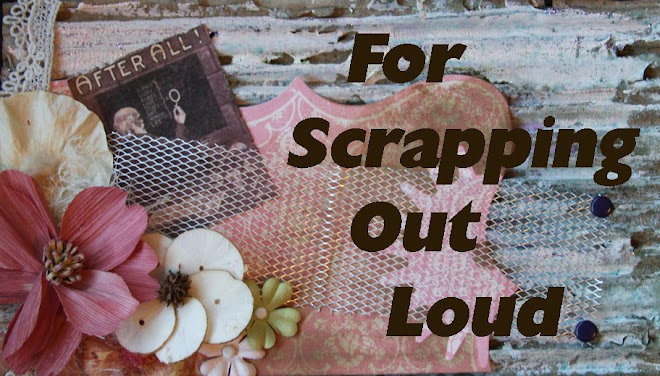
One awesome thing about this months reveal, is all the photos I used were taken and edited by my children and they did a fantastic job on them!!  This first layout is of my dd, Rylee and it's based on the sketch of the month by Charlotte aka Suepup.  I called this layout Tranquility.

Check out these gorgeous Prima flowers!!

The best advice I can give when using the Dusty Attic chicken wire chippies is to cut them out of shape so they are uneven pieces. 
 You can't go wrong with trims and textures.  LOVE!!
 This next layout features a pic of my dd, Tyler that she took.   This layout is called Advice.  Lots of layers on this one.


 This is hard to see in the picture, but it reads, "Parents can only give good advice or put them on the right paths, but the final forming of a person's character lies in their own hands." -Anne Frank
 I used items from the Color Add On to create this checkerboard look.  I used the stencil to first spray blue ink and then blotted it with a paper towel.  Then used a sponge and went over the stencil again using gesso.  Easy to do and it gives a really neat shadow effect.  You can wait until the ink is all the way dry before applying the gesso so that the colors don't mix, but I wanted them to mix a like this, so I did it right away. 
 This next layout is called Blue Shoes and was taken by my daughter, Rylee.  I don't what it is, but I just love this shot.  Plus the Authentique papers went so well with the photo, it was meant to be.  


 Same effect with this part of the stencil as above.  Spray first then sponge it with gesso. 

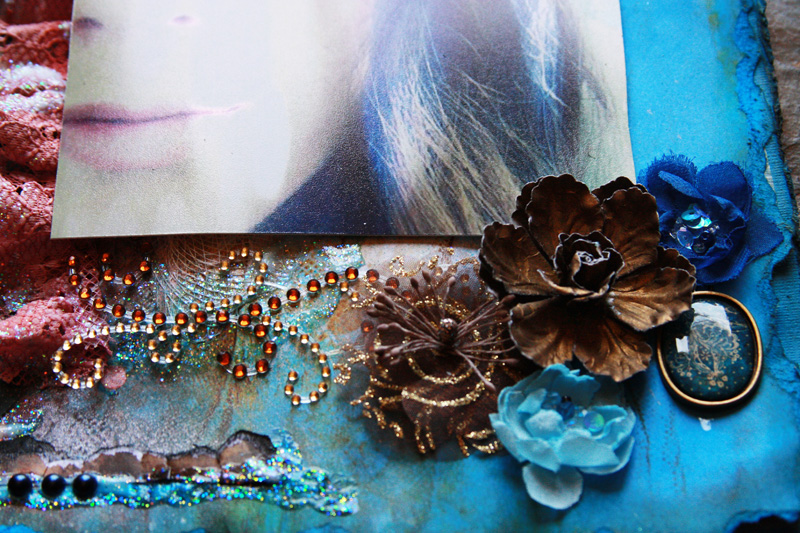
Last but not least, here is a layout that features a photo of my oldest daughter's tattoos that she got done on her wrists.  I did add some of the Dusty Attic bricks from the Brick Wall chippie.  This layout is called Strong and her tattoos read, Strength for Today, Hope for Tomorrow.


 I created the texture using Gesso, Sparkle Mod Podge, Donna Salazar Fairy Dust and Dylusions Misting Sprays.

Here is a pic of the main kit!!

Thanks for stopping by and God Bless!!


Tuesday, June 19, 2012

~Donna Salazar E-Classes~

If you haven't checked out the Donna Salazar ning site, now's the time to do it!! Donna is offering a 30 projects in 30 Days!! Fun and easy classes that you are gonna love!!

Friday, June 15, 2012

~Dusty Attic Wall Hanging~

Ok I know I've been making a lot of wall hangings, but I have a lot of kids lol!! This one was created for my son who is a cute little cowboy!!  I found the quote on a cowboy quotes website.  There were some pretty cute ones, but this one had really good meaning.  I stuck it on an old board outside to get the pictures taken.
 I used a couple new chippies along with an older one. These chippies here are the Water Pump and Wagon Wheels.  I just coated them with some ink and did some shadowing.
 This is an older chippie called the Windmill #3.  Such a cute chippie!!
 I am going to be putting this roped wire in my Etsy, because it's super easy to work with since it bends and it's sooo cute on boy layouts!!  
 I did my old wood look on the round background.  All it is was a piece of plain chipboard.  Click here for the tutorial.
Don't forget that I am selling chippies in my Etsy shop!! Thanks for stopping by and God Bless!!


Sunday, June 10, 2012

~Donna Salazar Wall Hanging~

Hello Again!! I'm back with a fun new project that I created for my daughter's room!!  I made her a cute little wall hanging in fun Americana colors using Want 2 Scrap chipboard, denim, and canvas - plus lots of other awesome products by Donna!! 
Get more out of your Sprightly Sprockets by using them as masks first and then layering them over the top!!


Thanks for stopping by!! Below is a list and links of the products I used for this project!!


LinkWithin

Related Posts with Thumbnails