Saturday, August 31, 2013

~Scraps of Darkness Rustic Kit~

I'm back with more layouts from the August Scraps of Darkness kit called Rustic.  I've enjoyed this kit a lot and the newest set of pics that I've taken of my girls go really well with it.
 
This first layout is of my 16 year daughter.  I called the layout America Honey.  I got the title from the song by Lady Antebellum.  I love their music.  The leaves and sun flowers are doodles that I drew, colored, and cut out.


 The crumpled strips of paper are from a package I received a while back.  It was actually the packing material :)

 This next one is of my youngest.  I called it Love Your Dimples!

 I applied some narrow masking tape to the edges of the journaling card and I think it was a cute addition to the layout.


For my last layout I used a pic of the two of the above together :)  I love this photo!


 The trick with the raised font I got from Gabi P!! It's done using a stencil and modeling paste.

Thanks for stopping by and God Bless!!


Saturday, August 24, 2013

~The "Let's See How it Turns Out Project" - Donna Salazar Designs~

 
Hello everyone! It’s Mandy again!! So, have you ever experienced a creative block? You know the one where you stare blankly at your craft space wanting to create something, but you have absolutely no clue where to even start. I think we have all been there before, and you know what, its ok. It happens!!
 
We all have our little ways of finding inspiration and one of the ways I find is to just to dive right in. Gather your supplies and just go for it.  Let your hands do the thinking for you.  So, for this little project below, I did just that. I started digging into my awesome supplies that Donna sent me and grabbed a little here and a little there and this is what happened.
I didn't have a supplies photo, since I wasn't sure what was going to be used, but I recommend grabbing things you love working with, like specific colors of ink, bling, lace, textures, etc.
 
~Here's What I Did~
I didn't have a small canvas to start with, so I made my own.  I used the Want 2 Scraps 6x6 Canvas Sheet and glued it on top of a 6x6 piece of heavy chipboard.
I didn't picture this next step, because it's my hands were getting really inked up and I didn't want to get my camera messed up.  All I did was use the reinkers for my Mix'd Media Inx and chose a few colors and colors my canvas using a dry paint brush.
Next I started using small torn off strips of masking tape and just went around my edges.
I normally don't drizzle on my paints or inks, because it gets this sort of look below, but I figured I would go over and blend it out later.  At this point I have no clue what direction I want my canvas to go yet lol.
 Next I went over my edges with smooch spritz sprays.
 Then I went over the tape, edges and center with more Mix'd Inx reinkers and gesso.  This still looks like a big ole mess!
 Fairy Dust Time!
 I finally figured out this is the way I wanted it to go.  I stamped the background using gesso.
 Added a doily on the edge and let it sit for awhile!
I finally got some more time and was able to finish this up.  I didn't do anything else to the background except spritz it with water to blend the colors in.
 
Below is the actual finished canvas.  To finish it up, I added alphas, bling and some dangling stars.


Thanks for stopping!! Below you will find a list of products that I used on this mini canvas!
 
Materials:
Want 2 Scrap Canvas Sheet
Heavy Chipboard[

Ink:
Mix'd Media Inx CHOX - Peridot, Patina, Wisteria

Stamp:
Stampers Anonymous - Dear Sir
 
Bling:
Want 2 Scrap

Tools:
Clearsnap Colorbox Stylus Handles and Tips

Miscellaneous:
Masking Tape
Doily
Gesso
Floss


Thursday, August 15, 2013

~Scraps of Darkness August kit called Rustic~

This month's kit by Scraps of Darkness is very vintage country and I'm loving it!! August's kit is called Rustic! Don't miss out on this one, because it's gorgeous and, as always, VERY versatile! For my first layout I scrapped a few photos of my gorgeous daughter, Tyler, and I used the sketch by SOD designer Laura Gilhuly. Be sure to come back on August 31st to see more projects by our DT from this kit!
August Kit Sketch

 This is a really easy little technique.  Just take the twin and wrap it around the back of the photo at the top, then twist and twist, then wrap the bottom ends around the backside of the photo and adhere them. 


The Rustic Kit!!
And as always, thanks for stopping by and God Bless!! :D


Saturday, August 10, 2013

~Gift Tags - Donna Salazar Designs~

Hi Everybody!! I'm back with a few little tags to show you!! One thing I love is doodling and drawing little pictures.  Sometimes I incorporate these little doodles into my designs as well.  This time I decided to make some little gift tags.  These are about 2x4 inches in size and I will use these on gifts that I give.

Thanks for stopping by!! Please see the list below for products used on these little tags!
 
 
Paper:
GCD Studios Stax

Ink:
Mix'd Media Inx CHOX - Sparrow
Mix'd Media Inx - Adobe, Berries, Peaches, Indigo, Verdigns, Mossy

Stamp:
Stampers Anonymous - Bricks, Stanza, Swirls
 
Stencils:
Want 2 Scrap - Arrows, Alphabet, Love

Tools:
Clearsnap Colorbox Stylus Handles and Tips
 
Miscellaneous:
Distress Pens
Alphabet Stickers
Gesso
Glitter Glue

Wednesday, August 7, 2013

~Scraps of Elegance Layout~

Although, I'm not a designer for Scraps of Elegance, I still indulge myself with a kit now and then.  I created this layout with the Yesterday's kit. This is a photo I took of my daughter when we were camping last summer.  In the background there is a little fawn drinking from the stream.  It's not everyday you capture an image like this one.


 In this close up you can see the fawn a little better.
Thanks for stopping by and God Bless!!


Monday, August 5, 2013

~Promotion for Scraps of Darkness/Elegance~

This is a great opportunity to kick off your new subscription to one of two or both :) kit clubs!! 

Friday, August 2, 2013

~Little Idea to Display Photos on the Wall~

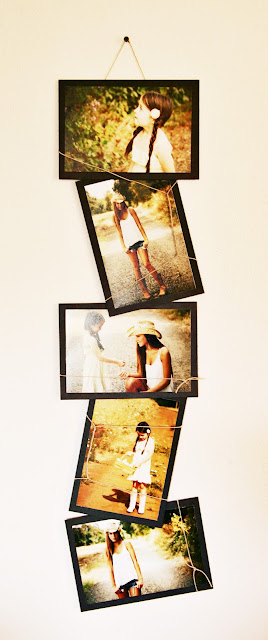
I love photography and I take a ton of pics and I am running out of ideas on how to display them on my walls at home.  I get bored with the everyday framed looked, so I came up with this little idea to display several photos.
 
I did a couple different ones of these.  The photos are all 5x7.5 inches and I matted them on thick black chipboard.  The chipboard is 6x8.5 inches, so it shows a half inch all the way around.  Then I adhered them together and them used twine to go around the photos in different ways to add a little something extra.
Sorry the photograph wasn't super great of it.  I had some glare on the middle photo. 
 
Thanks for stopping by and God Bless!!


LinkWithin

Related Posts with Thumbnails