This layout below has what I call nice and neat edge distressing. For the most part it has straight lines with roughness just on the edges.
 A couple of tools you can use to get the above look are this Tim Holtz paper distresser or an exacto knife such as the Cutterbee. Some people use the blade on scissors as well, just as long as they are sharp enough. Now the Tim Holtz has directions included, but when you use and exacto knife or scissors you want to run the blade sideways along the edges. You will then begin to see the paper fray up a bit. The more you run the blade across the paper the more it will fray.
 Below is a non uniform way to distress your edges. This layout below has been featured on my blog in the past for the flower, but it is also a great example of a very distressed edge. To do this I just run my scissors around the edge of my paper, cutting like you would wrapping paper, just let the scissors glide. If it tears a little, no big deal, it will only enhance the look more. You can decide to have more control with your lines like the photo mat or just go wild like the background paper.
 Enhancing your edges isn't hard either. You can use inks and water. For example if you want an inked edge that looks like it's curling up, you can simply ink it then spray your paper with water around the edges and crinkle them up or roll them up. When it drys it looks really neat, because the ink runs just a little and the paper dries rolled and crinkled. I will generally use Ranger Distress Inks and Blending Tool when inking.
I did say several ways to distress your edges didn't I? Don't forget simply tearing your edges. That's a great way to create a neat look including a burned look. Make sure you are tearing the paper so that you can see the layers torn. Then I use Black or Dark Brown inks on the torn areas. Another way to get a burned look is by actually burning the edges lol. I've done that too, but I don't like the ashes that fall off the edges.
One more way to distress your edges just a little, but not actually all the way around. Just take scissors and make little 1/8" to 1/4" snips here and there around the edges of your paper. Then fray up the snips just a little. I did this around the background paper on this layout. I did make two large tears at the top and just cut some different pattern paper to stick behind it. I had to go back and actually correct this layout because I put the wrong year on it lol. That happens sometimes.


 This is a pic of my daughter Tyler when she was 1 1/2. I distressed almost every part of this layout. I will be going over a lot of the techniques you see on this layout. Can you see the cute kitty in the background? That was our Persian cat named Tequila. We got her from an older lady that had a large amount of cats and needed to get rid of some. The funny thing is they were all named after some form of alcoholic beverage. My sister took a white cat named
 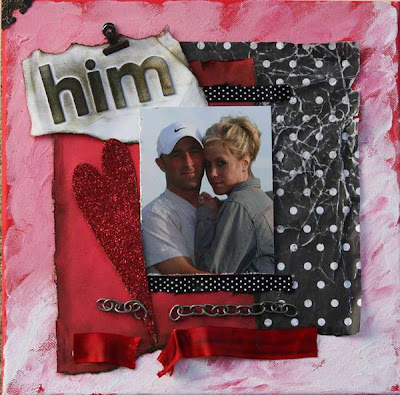 Here's a quick how to on what I did. I started with using red alcohol ink and covered the entire canvas with it using a blending tool. Then I went over it with some